

|
Getting secure WLAN by using OpenVPN on a WRT54G under OpenWRTIf you want to use OpenVPN just to get your WLAN secure so that nobody can snoop your packet contents and nobody can use your system to get access to the internet, this is probably the right page for you. If you decide to configure your system like it is described here you have to do it carefully without leaving one or more steps out. This is important because everything is working very closely together. This configuration is based on OpenVPN version 2.0-beta...! All connected machines (clients) must have a 2.0 version of OpenVPN.I have spend a lot of time to find the configuration I am describing here. I think this is one of the standard configurations of an OpenVPN server on the WRT54G and therefore it should be documented. Hopefully, it will help save some of your time! But, I have to mention one additional point: "This configuration has only been tested with my WRT54G-Ver1.1!" Because everything is done by using the nvram variables you should only have to check/change the nvram settings. Changes/History
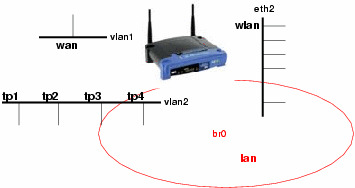
The system layoutMy intention for this system configuration was to get the system behavior just as it was before the installation. The new security aspect should be totally transparent to the user of the system. The system should be able to handle Linux clients as well as Windows clients.
So what can be done? The trick is to block everything coming from eth2 which isn't certificated. Here OpenVPN joins the game.
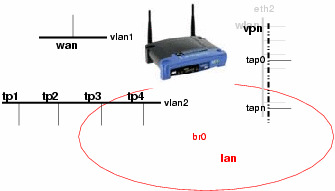
Creating the keys and certificates needed by OpenVPN in tls-server modeThis description is taken from the OpenVPN home page. Now the openssl is configured to produce a key/certificate pair for the openvpn server and each client you want to give access to your private network represented by the bridge interface br0. for each key/certificate pair you have to specify several parameters e.g. company name etc. Because the OpenVPN server takes the client names for individual configurations, the name entry of the key/certificate should be different and mappable. If the clients are uniform in configuration you can take generic names like clientX. OpenVPN Server configurationGetting the correct timeThe usage of OpenVPN requires a correct time setting on all machines that want to build a tunnel between them. That means you have to get the right time at the startup procedure of the router. With the ntpclient application you can obtain the correct time. I have inserted the following line into the S50services startup script: You should take one ntp server which is located close to your router. In Germany where the time is made ;-)) the PTB Braunschweig is one server you can trust. This configuration leads to the effect that every time the router is turned on a connection to your ISP is made to get the right time. Server configuration file "server.conf"First of all, the OpenVPN server has to get the information on what to do and where to find additional information. This information is located in the file server.conf, which looks like this: This configuration requires two additional scripts/configurations which are executed/evaluated while the server starts/the connection comes up. The first one is a script which is used to add the interface to the lan bridge and to add firewall rules to get access from the WLAN to the OpenVPN server which is about to start. To understand what is done in detail have a look at the description of the startup scripts S41openvpn and S45firewall. The following frame consists of the important stuff in this script: I like a fixed mapping of IP addresses to my clients. This mapping is stored in the client specific configuration files located in <client-config-dir>. These files are named by the entry of the keys/certificates. In my system the contents are like (with different IP's): The configuration of the DHCP server of the WRT must exclude these IP's which are reserved for WLAN clients (see Configuration of DHCP and DNS). Additional nvram entriesTo keep the configuration consistent some configuration details should be set in the nvram to get global access from all configuration files. We have two additional things to configure, the WLAN part and the new base configuration for the bridge. The following frame contains all entries to set the configuration files. Startup file S41openvpnThe intent of my configuration was to make it very simple to reactivate the original configuration. This will probably conform with your interests. This means the original interface's configuration is built by the S40network script. After that work is done the S41openvpn script brings up the interfaces for the OpenVPN configuration and starts the desired OpenVPN server processes. This is shown in the following frame: Startup file S45firewallAt the moment when this script is executed all of the interfaces are setup correctly. The only part missing is prohibiting the access to the router from the WLAN, except for services needed to connect the OpenVPN server and get an IP address. There are too much changes to the original version of the firewall script so that my startup script replaces the original one. The original script is allways available in /rom. My script looks like this: Configure dnsmasqFinally, we have to startup a DHCP service for the new and separate WLAN net. The request for an IP address will be the first contact a wireless client makes to the router. Therefore, you have to alter your /etc/dnsmasq.conf file. You have to add a dhcp-range line for the new net. In addition, you have to change the lan entry to separate the dhcp range from the addresses which are set fixed by the OpenVPN client-config files (that is why the upper bound is set to 99 in the first entry). First try and installationThe frame below shows where to put the mentioned files. To transfer the files it's easiest to have a ssh daemon installed, e.g. dropbear. Because it's always dangerous to change the startup configuration of the system, the system might be in an unusable state afterwards. I suggest to make a test of the configuration first. Rename the startup scripts so that their names start with something different than S, e.g. TS41opnvpn and TS45firewall. Checklist: Transfer all files to their intended locations. Make the mentioned configurations in the files on your router. Create all missing nvram entries. Test the installation and fix the configuration by renaming the startup scripts. File location tableFiles to install Files to change/configure File attributes Test the configurationRestart the router and check if the time is set and if everything is working as before. The best way to test the configuration in this state is to connect your computer to a TP connector at the router. Start /etc/init.d/TS41openvpn. After that is done, your shell should be unusable, because this script is closing the interface that you are currently using. Start a new ssh/telnet connection to the router. Check the state of the bridge: If eth2 is utilizing the bridge the script wasn't executed correctly. Check the execution permissions of the script. If the tap entries are missing, then the OpenVPN server couldn't start as expected. In this case, we can start it by hand and check if the server can say what's wrong. Check the process table and kill all openvpn processes (if there are some) and start one by hand: Some additional checks should also be made: If you connect a wireless client to the router, the client should get an IP address of the insecure range 192.168.2.0/24 set in dnsmasq.conf. OpenVPN Client configurationThe configuration of windows and linux clients is nearly the same. The difference is the configuration of the DNS service which must be switched to the secure net, this is a very unusual behavior. This is necessary because the DNS service is an outgoing service and might initiate a call to your ISP that cannot be admitted from the insecure wireless net. On windows clients, this configuration is done in the server.conf of the router, but this is a windows specific configuration. On linux clients, we have to use two scripts to do that work, "client-tun.up" and "client-tun.down". The common client configuration "client.conf"The following frame shows the common client configuration. Only the server port to be used, the location/names of the keys and certificates must be set, depending on the installation of OpenVPN. Setting DNS service on the client machinesThe change of the DNS service location of the linux machine is done by the linux-tun.up script which is shown below. This script saves the original resolv.conf and builds a new one where the router is set as a DNS server and the search entry is taken from the original resolv.conf: If the OpenVPN tunnel is going down. the original resolv.conf should be restored. This is done by the following script: Don't forget to set the execution bit of the up/down scripts! Windows ClientsTo avoid that windows is using the insecure wlan for netbios services you have to disable these services for your wlan network adapter. These services should be enabled only for the new virtual tap network adapter. Final OpenVPN testNow everything should be configured correctly. Test if everything works together. First start one server OpenVPN by hand. Now start the OpenVPN client on a wireless connected machine which uses the port provided by the server you just started. You should see the process of building the connection. Hopefully, the connection can be established ;-)) Generally, it should not be possible to build up an OpenVPN tunnel from the TP LAN. The firewall will block these requests, but this firewall configuration isn't activated yet. That's the reason why you should use a WLAN connection to check the building of the connection! I don't know what would happen if you try to connect from TP LAN. If everything works fine rename the TS41openvpn to S41openvpn. After a reboot of the router everything should work as desired. Only blocking the WRT access, from the wireless lan, isn't activated yet. Activating the firewallAfter activating the firewall script by starting TS45firewall everything should proceed as it was. Try to connect to the router by using telnet or ftp on the insecure net (192.168.2.0/24). There shouldn't be any answer from the router because the request is eaten up by the firewall, i.e. the client is waiting and waiting for the answer and finally responding "Connection timed out". You should notice a difference if you try these services on the secure net (192.168.1.0/24). You should immediately get an answer even if it is "Connection refused". Finally check if it's still possible to get an external connection. If everything works fine move TS45firewall to S45firewall. This replaces the original startup script. DownloadI have tared everything together. The first file contains all configurations to be made on the WRT54G except certificates and keys. The second file is the linux client configuration. Follow the comments in the configuration file to transform it to a windows configuration file. Have a look at the changes section at the beginning of the page, in that case I have forgotten to update the archive files you have to do that by your own! ;-))DisclaimerAlthough I have made and documented everything with care there are probably some bugs on this page or in the downloads. This is the reason why I don't give any warranty of any kind! If you find a bug or if you have any suggestions for improvement or changes of the described configuration feel free to contact me! Cheers, Special thanksTo David Theriault for correcting the grammar of this document to make it more readable! |
| |||||||||||||||||||||
|
|